 |
| image credit |
Thursday, January 31, 2013
Quote - Closer to understanding
Wednesday, January 30, 2013
DIY :: Valentine's Heart Wreath

I just love my new wreath I made last week when I was organizing my living room. It's simple and rustic and serves as a reminder each time I walk through the door. The banners that I used are from last year's Valentine's Vignette that I left up all year on my mirror. I thought the sentiment was sweet and should stay up year round. Since I was busy with my living room I didn't have time to take step-by-step pictures but you get the idea from the finished pictures and descriptions.

I picked up a heart-shaped grapevine wreath from Michaels.

The heart banner was created by cutting out or punching heart shapes from red cardstock. I added a few drops of hot glue to the back of the hearts and adhered to the bakers twine.

I draped the heart banner across the top portion of the wreath and tied to each side. I added a drop of hot glue to secure in place.

I randomly added a few sections of the heart banner to the lower portion of the wreath, cut the twine, and secured with hot glue.

The love banner was found at Whisker Graphics and printed on cardstock. I cut out each letter and a few hearts, punched holes on the top of each piece, and laced bakers twine through the punched holes.

The love banner was draped across the top portion of the wreath just below the heart banner, tied on each side, and secured with a bit of hot glue. Easy peasy!

Thanks for stopping by!

I'm linking to Positively Splendid, 52 Mantels, and Project Inspire.
Hugs,

Wishcasting Wednesday :: What nourishment do you wish for?
Thank you for joining me for this week's Wishcasting Wednesday. If you'd like to join this magical circle of dreamers and doers, please visit Jamie Ridler Studios.
This week's prompt:
I wish for nourishment of my heart as I continue to heal it from past hurts. I’m slowly repairing the cracks and tears to make it whole again.
I wish to nourish my soul as I learn to paint bravely, intuitively, and joyfully. I wish to enjoy the process without expectations.
I wish to nourish my body as I provide it with healthy provisions and heaps of hydration. I wish to feel energetic enough to provide it with much needed movement. I wish to comfort my body as it withdraws from the sugar and caffeine that I’ve previously dumped into my system. I wish to stay committed to good health and not be lured away by items unfit to be labeled food that I generally stuff in my mouth without thought.
Also, I wish for you, the nourishment you need to feel whole, alive, and free.
Hugs,

This week's prompt:
What nourishment do you wish for?

I wish to nourish my soul as I learn to paint bravely, intuitively, and joyfully. I wish to enjoy the process without expectations.
I wish to nourish my body as I provide it with healthy provisions and heaps of hydration. I wish to feel energetic enough to provide it with much needed movement. I wish to comfort my body as it withdraws from the sugar and caffeine that I’ve previously dumped into my system. I wish to stay committed to good health and not be lured away by items unfit to be labeled food that I generally stuff in my mouth without thought.
Also, I wish for you, the nourishment you need to feel whole, alive, and free.
Hugs,
I Choose

I choose happiness
the road less traveled
where the grass is greener
and the flowers bloom wild
I choose joy
in the little things
because these are usually
much bigger when near
I choose peace
in all that surrounds
to give more than I take
to make the world better
I choose love
to friend or stranger
to give big
and perhaps receive
I choose faith
when times seem dark
to find that glint of light
in a cloud of grey
I choose hope
because without it
there is little chance
for a brighter day
Hugs,

Tuesday, January 29, 2013
Finding Your Inner Om

Worry looks around, sorry looks back, and faith looks up. ~Ralph Waldo Emerson
Calm
is more than just being relaxed. Calm is when your whirling, twirling mind
slows down long enough to meet with your spirituality. Calm is when your trust
is greater than your worry and anxiety. Worry and anxiety can emotionally hurl
you to your wit’s end yet they can also be your greatest teachers. These
emotions allow the opportunity for your utmost growth and expansion. That is,
if you allow them to teach you, seek calm in your life, and aim to connect with
that which is larger than yourself.
-Focus
on the here and now instead of projecting your apprehension into the future.
Worry tends to remove us from the present moment.
-Trust
your intuition on when to wait and when to act. Worry and anxiety feeds our
need to control.
-Notice
when your anxiety rises and recognize that this is your spirituality
disengaging. This is the time to move toward reconnecting.
-Ask
yourself what divine teaching an emotion is trying to teach you.
-Seek
anxiety relief with alternative therapy and bodywork such as massage,
acupuncture, reiki, visualization, mediation, or therapeutic touch. You can
also try calming yourself by placing your palm of hand over your heart chakra
(located mid-chest) which is the energy center for unconditional love.
-
Above all else, be more warrior than worrier.
 |
| Buddhist Loving-Kindness Prayer |

Monday, January 28, 2013
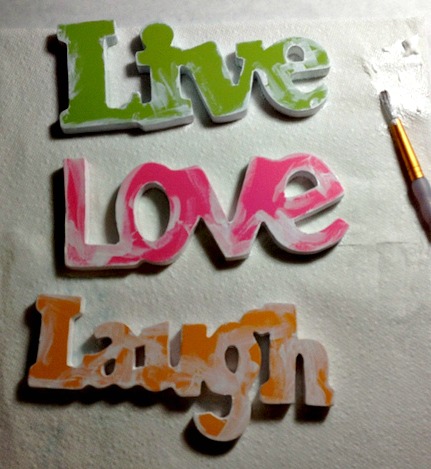
DIY :: Customized Word Art

In my post last week of my completed living room, I showed pictures of wooden live, laugh, love words mounted on the entry wall. I realized that everyone may not know how to create these so I thought I'd share a little tutorial with you today.
Select wooden letters or words from your local craft supply store. They are usually unfinished or white but these happen to be pre-painted.

Choose the color you'd like to show along the edges. Paint the edges and inside letters with cutouts (like "O" and "A"). You don't have to be super neat (I'm not!) because any messiness will be covered up.
Select your scrapbook paper. Flip the paper on the opposite side and the wooden word and trace with a pencil.


Cut out the tracing.

Lightly sand the top surface of the wooden piece and wipe off any residue.

Apply a coat of Mod Podge to the surface of the wooden piece.

Gently apply the traced scrapbook paper onto the Mod Podged surface. Smooth out air bubbles with fingers or an old hotel key card. Allow to dry.

Apply a couple coats of Mod Podge over the paper and allow to dry.

Trim off the excess paper with a blade or small scissors. Sand the edges until there is no paper overhang and the paper practically becomes part of the wood. This takes a little while so I usually move into the living room and watch some Netflix until I'm finished (and vacuum the mess I make).

Wipe off any remaining residue and apply a topcoat of Mod Podge. I like the distressed edges but you can touch-up the paint if you choose.

Attach a picture hanger to the back of the wooden piece. Some words and letters will be difficult to do this so I generally use a combination of a picture hanger and double-sided tape. I use the hanger to get it on the wall and a couple small pieces of double-sided tape inconspicously placed to keep the word level on the wall.

Finished!

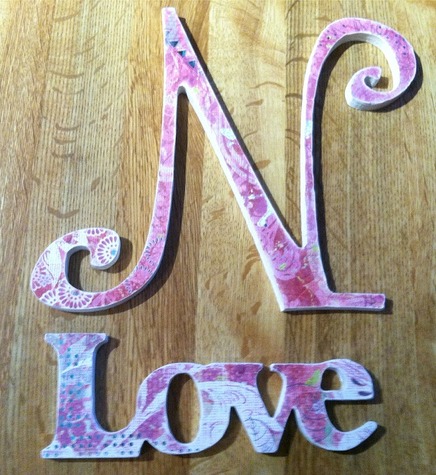
Here are a few wooden pieces I've completed in the past:
On this hanger I painted my edges in a complimentary color to the paper.

You can't tell in this picture, but I added a touch of Distress Ink to the edges of this "D" for my son's room.

This wooden letter and word was part of a baby shower gift for a friend.
I'm linking to:

and Project Inspire.
Hugs,

Quote - Life Support
 |
| image credit |
All things share the same breath—
the beast, the tree, the man...
the air shares its spirit with
all the life it supports.
~Chief Seattle
Sunday, January 27, 2013
Vintage-Inspired Art Journal Pages
I guess I was feeling a bit nostalgic this weekend and worked on a few vintage-inspired art journal pages. The roses are pictures I took last year from my garden. I transferred the images onto fabric and then dyed the fabric in coffee to age it.
On this page I hand-stitched the word "rose" onto the fabric before Mod Podging onto the spread.


I used vintage wallpaper and book pages for the background of this page and added a few hand-stitching to attach the rose image to the "delight" tag. I added some tea-stained lace and ribbon to the edge.


Vintage book pages were Mod Podged to this page then coated in watered down gesso and walnut ink.


I used vintage dress pattern paper as the background for this page. I added some walnut ink and some Perfect Pearls Mist to age the paper even more.


I used Distress Ink and stamps on book pages for this background. I added an (almost) square of gesso for the quote. The flowers came from a vintage birthday card.


The background for this page is torn pieces of book pages and sewing pattern paper layered with coats of watered down Mod Podge.


I hope you had a wonderful weekend!
Hugs,
Subscribe to:
Posts (Atom)