
In my post last week of my completed living room, I showed pictures of wooden live, laugh, love words mounted on the entry wall. I realized that everyone may not know how to create these so I thought I'd share a little tutorial with you today.
Select wooden letters or words from your local craft supply store. They are usually unfinished or white but these happen to be pre-painted.

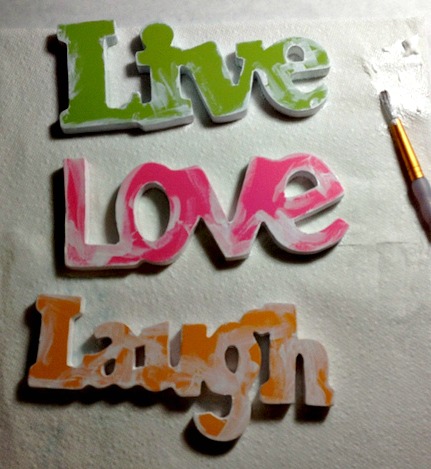
Choose the color you'd like to show along the edges. Paint the edges and inside letters with cutouts (like "O" and "A"). You don't have to be super neat (I'm not!) because any messiness will be covered up.
Select your scrapbook paper. Flip the paper on the opposite side and the wooden word and trace with a pencil.


Cut out the tracing.

Lightly sand the top surface of the wooden piece and wipe off any residue.

Apply a coat of Mod Podge to the surface of the wooden piece.

Gently apply the traced scrapbook paper onto the Mod Podged surface. Smooth out air bubbles with fingers or an old hotel key card. Allow to dry.

Apply a couple coats of Mod Podge over the paper and allow to dry.

Trim off the excess paper with a blade or small scissors. Sand the edges until there is no paper overhang and the paper practically becomes part of the wood. This takes a little while so I usually move into the living room and watch some Netflix until I'm finished (and vacuum the mess I make).

Wipe off any remaining residue and apply a topcoat of Mod Podge. I like the distressed edges but you can touch-up the paint if you choose.

Attach a picture hanger to the back of the wooden piece. Some words and letters will be difficult to do this so I generally use a combination of a picture hanger and double-sided tape. I use the hanger to get it on the wall and a couple small pieces of double-sided tape inconspicously placed to keep the word level on the wall.

Finished!

Here are a few wooden pieces I've completed in the past:
On this hanger I painted my edges in a complimentary color to the paper.

You can't tell in this picture, but I added a touch of Distress Ink to the edges of this "D" for my son's room.

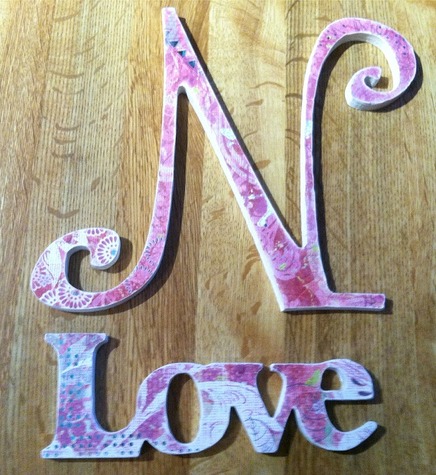
This wooden letter and word was part of a baby shower gift for a friend.
I'm linking to:

and Project Inspire.
Hugs,

1 comment:
LOVE this project, as well - Amanda - I would love to try my hand at this - Looks like a fun Spring Project ;)
~Kristine
Post a Comment